A new dash

Posted on October 14th, 2014 in Economy,testing,tools by Julian Edgar

I’ve always enjoyed having lots of gauges in a modified car. Even in my first car – an air-cooled, 2 cylinder Honda Z – I fitted an oil temperature gauge. Subsequent cars have had gauges that show everything from exhaust gas temperature through to air filter restriction.

So it’s not surprising that I have been enjoying the MoTeC CDL3 digital dash that I have fitted to my Honda Insight.

What has surprised me, though, is how much my enjoyment of the car revolves around the dash. These days, where driving fast means that you get locked up, having the ability to be entertained by the dash rather than by just the driving is a major advantage. And being able to program the dash to show the parameters you want adds another layer of enjoyment.

So I have the dash displaying on the main screen:

– Engine rpm (bar graph)
– Speed (derived from the dash’s GPS input)
– Gear (worked out by the dash based on road speed and revs)
– Fuel level (using the standard Honda fuel tank sensor, with the result calibrated in per cent)
– Engine temp
– Lambda number (showing mixture strength, where Lambda 1 = 14.7:1 AFR)

Then, on the bottom line of the screen and able to be scrolled through by pressing the standard Honda FCD button on the dash, I can further bring up:

– Manifold pressure
– Inlet air temp
– Fuel injector duty cycle
– Engine oil pressure
– Engine oil temperature
– Ignition advance
– EGR valve duty cycle
– Water/air intercooler pump duty cycle
– VTEC on/off
– Lambda short term trim
– Lambda long term trim

The dash is also able to be configured to display different text-based warnings. I currently have warnings displayed for:

– Seatbelt
– Door open
– Engine hot
– Engine cold
– Oil pressure
– Lean
– Battery level
– Inlet air temp
– Fuel level
– Change up
– Change down
– ECU hot
– Dash hot

These warnings are all ‘smart’ – eg the seatbelt warning shows only when the car exceeds 5 km/h with the seatbelt off, and the ‘change up’ warning shows only when a certain combination of throttle position, gear, manifold pressure and road speed occurs.

The CDL3 dash is now part of the old range of MoTeC dashes that use a B&W LCD (rather than the newer models’ colour displays) and cannot be configured with anywhere near the versatility of the current stuff. However, the major advantage from my perspective is that the old dash shape fits perfectly into the Honda’s instrument binnacle.

So what can’t the CDL3 do, things that I’d really like? The answer is not what I would have thought before buying it: more than anything else, I’d like the dash to be able to perform maths functions. For example, to be able to show trip fuel economy, where fuel used is divided by distance travelled. And I’d also like it to be able to show maxima and minima of all readings, and….

In fact, the CDL3 has been such a success that I am upgrading to the ADL3 dash – same footprint and display, but the ability to do maths functions… and a whole lot else. Luckily, like the original CDL3 dash, I have found one second-hand – as I write, it’s on its way.

Bloody brackets….

Posted on March 18th, 2014 in Hybrid Power,Materials,tools by Julian Edgar

I hate making brackets that hold things driven by belts.

The last, most horrible job that I performed in this area was installing a supercharger on a Toyota Prius. I wanted to get the little blower mounted in a position where it could be driven by a longer version of the standard serpentine belt. This required painstakingly accurate building of a heavy duty and rigid bracket. The only place to put the bracket was where the engine mount sat – so the new bracket also became a new engine mount.

In itself that wasn’t so difficult, but getting the pulley mounted in exactly the right plane was just so time consuming.

However, in the end, the belt drive system (including a new idler pulley) worked perfectly – pity the supercharger was so noisy that it all had to come off again.

Right now I am building the bracket to place an alternator on a 2001 Honda Insight. (The Insight doesn’t normally use an alternator.) I don’t know if it’s just me, but this darn bracket is taking me forever.

The alternator is being located between the engine and the firewall, with access possible from both top and bottom. But the bolts on which the mount can ‘pick up’ are few and far between, meaning the bracket has to be a complex, odd shape.

Furthermore, it needs to provide the mounts for two idler pulleys. Why two? Well, they are needed so that firstly, there’s enough belt wrap around the crank pulley; and secondly, so that the belt misses the engine mount.

The resulting alternator bracket needs to be stiff, able to be installed (more difficult than it sounds when the fastening bolts for the bracket are on the side of the block, the end of the block, and under the block), and of course needs to be able to be built.

So how long is this taking me?

Including making a mount on which the alternator can sit temporarily as it’s juggled into the correct position, positioning the two idlers, clearing the torsional vibration damper on the driveshaft at full suspension bump, nestling the alternator as close as possible to the engine block, moving things around so an off-the-shelf belt will fit – and then cutting and welding 8mm plate, positioning the alternator drive pulley and the two idler pulleys in exactly the right plane, straightening bracket distortion after welding… well I’m still going on the bracket, and I reckon so far it’s taken me three full days.

I know I am a pretty slow worker, but three bloody days!

Anyway, the good news is that the top part of the bracket is now in position, the alloy engine mount has been milled to allow the plate to be sandwiched between the engine mount and the block without then causing a host of clearance problems, and as I write this, I am waiting for a belt that I think is the right size – better to have a belt on hand before I drill the hole for the second idler pulley….

Turning over a new leaf

Posted on March 14th, 2014 in Intercooling,tools,Turbocharging by Julian Edgar

Over the last few weeks I have been working on my little Honda Insight. I’ve been installing a turbo, water/air intercooler system and a new airbox, the latter fabricated from scratch.

It’s a complex job in that there’s not much space – especially when I am deliberating oversizing everything (but the turbo) to improve volumetric efficiency.

I am also doing things in a significantly different way to the approach I’ve used previously.

So what’s different then?

Specifically, I am being very careful that each newly-placed nut or bolt can be easily accessed by a tool. This means that instead of just looking at aspects like strength, weight and functionality, I am adding another criterion – can I get a spanner (easily) on that bolt?

It might seem a kinda obvious thing to do but I must admit I have never much done this in the past. In fact, I remember working on my little Daihatsu Handi turbo, way back around 20 years ago. The water/air intercooler I first installed on that car was so tight for space that the nuts had to be placed on bolts using long-handled, long-nose pliers. Yes, both long-nose and long-handled!

It was like performing surgery.

I got so jack of it that in the end I removed that intercooler heat exchanger and fitted another that sat on top of the engine rocker cover, in clear view – and with clear access.

The trickiest job so far on the Honda has also involved a water/air heat exchanger core, the one that sits on a fabricated steel frame bolted to the top of the gearbox, next to the engine.

The intercooler bolts to the frame via three rubber mounts. I need to (1) gain access to the frame’s mounts to bolt it to the gearbox, and then (2) gain access to both ends of the rubber feet, and (3) gain access to the bolts that hold little (extra) brackets to the intercooler core itself.

So far I am JUST successful: the rear bolts for the intercooler rubber mounts, positioned partly under the windscreen in the deeply indented firewall, can be accessed by using a short 12mm spanner – not a ratchet spanner as it looks may be needed, but a conventional spanner. The other fasteners are all easily accessible.

Another tricky job were the mounts for the airbox. A long cylindrical design mounted at an angle to the horizontal, it also sits on the gearbox. By manipulating the bracket design until it was all ‘just so’, I am able to access all three mounting bolts using a long extension on my small socket set.

Importantly, making a design that allowed access to these points was almost the first step in the process – I didn’t position the airbox solely for plumbing access to the turbo. Had I done this, the bolts holding the airbox in position would have been ‘blind’, and furthermore, would have needed tiny hands to even get to them.

And I have to say, positioning the fasteners for good access has made it so much easier to work on the car. That’s especially noticeable when some items, like the airbox, have been on and off perhaps 50 times while the intercooler water hoses have been routed and then fastened into place, and then the intercooler-to-throttle-body tube has been fabricated (twice!).

So for me no more the bad habits of the past: now everything I install has to be easy to work on, no matter how small the space into which it must fit.

Beware black snot

Posted on April 22nd, 2012 in Driving Emotion,Safety,tools by Julian Edgar

If you’ve been sawing, grinding or filing metal, it’s likely that you’ve ended-up with a nose full of it. Not just snot – but black snot.

For years I thought it a just curiosity that resulted from that pursuit.

But now I am rather wary of it.

Recently, after spending a full day cutting and grinding, I started feeling a bit ill. The next day, going back to doing some more cutting and grinding, I wore a light dust mask.

But that night I still had black snot – and a hacking cough.

After a few days of feeling crap, I went to the doctor. I hate going to the doctor, but this one had the advantage of being the most beautiful doctor I’ve ever been to. And what did she say? You’ve got a virus – harden up.

But despite that opinion, I really do wonder if the metal dust that I’d been getting into my lungs didn’t have something to do with it.

Now when cutting and grinding, I wear a half-face respirator that has two double filters, one to catch particulate matter and the other for fumes. The result? No black snot – and filters that after only a few days of work, have changed from white to black.

Better caught in the filter media than in my lungs – or in my snot.

Beware that black snot….

Low sheen acrylic – with added photocopier toner

Posted on January 15th, 2012 in tools by Julian Edgar

When I hung my collection of jack-stands and ramps on the workshop wall, it was obvious they needed a repaint.

I didn’t much care what type of paint was used, so long as it stayed on for 10 or so years. But I didn’t have any suitable paint on my shelves. And when I looked at the local hardware store I couldn’t believe how expensive decent paint is – even those cans they were selling off at a discount because they’d mixed the wrong colour.

So next time I was at the local rubbish tip (the following day, as it happened) I looked around to see if anyone had thrown away a half-full can of paint. And there it was – a 4-litre can of Dulux Weathershield self-priming low sheen acrylic with More Sun Protection and a 10 year guarantee. Sounded good – and felt it, too – at a heft, the can seemed about two-thirds full.

But when I got it home an opened it I found the colour was bright white. Very bright, too. White’s not a great colour to paint axle stands and ramps… so what could I do to change the colour? A grey, for example, would be better than bright white.

I looked to see if I had any water-based black paint on my shelf to mix with it, but found nothing. So what did I have that’s dark and finely powdered? How about photocopy toner from an old toner cartridge? Yep, had one of those…

I opened the cartridge and poured some of the toner into the paint can. Then I stirred and stirred and stirred – and the paint returned to its original bright white! To cut the story short, I added the whole contents of the cartridge before the paint turned grey. But grey it was.

So what did it paint like? Beautifully, as it happens. The coverage was excellent and it just glided on!

And the paint has an odd characteristic: it deadens sound. The ramps and stands no longer ‘clang’ when dropped from a small height onto the concrete – instead they go ‘thunk’.

Another incredibly cheap digital meter

Posted on December 13th, 2011 in Driving Emotion,testing,tools by Julian Edgar

The story that we ran on the very low cost digital temperature display has proved to be extremely popular – hardly surprising, when only a few years ago such a display would have cost well over AUD$100. It is well made, has excellent functionality, and at a cost delivered to your house of about $25, absolutely unbeatable value.

But there’s also another digital display available at an unprecedented price. It’s not of direct relevance to cars or car modification, but if you’re interested in technical stuff, it’s a very good buy.

So what is it?

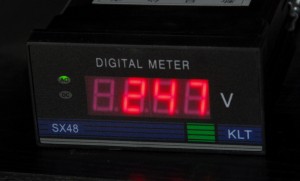
It’s a mains-powered LED panel meter that displays mains voltage. In other words, it constantly reads out the supply voltage to your house.

If you live in an area where you can see your (filament) lights dimming and brightening as loads are switched on and off inside the house, or switched on and off by neighbours, there are probably substantial variations from the nominal supply voltage.

Here in Australia the standard supply voltage is 230V with a plus tolerance of 10 per cent and a minus tolerance of 6 per cent – so from 216 – 253V. (Yes, isn’t that a huge range!)

At my house, in rural New South Wales, the monitored supply voltage has always stayed within those guidelines – but it has certainly used up a lot of that range!

The meter shows the turning on and off of an electric jug (the resulting voltage drop is about 2V) and clearly shows when the electric water heater cuts in and out. You can also see in winter when people in the hamlet are cranking-up the heaters, and in summer when they’re turning on the air-conditioners.

Cost of the meter? Just AUD$19 delivered to your door. Do an eBay search to find it and similar meters.

  • » Comments Comments Off on Another incredibly cheap digital meter

Driving something different

Posted on November 30th, 2011 in Driving Emotion,Opinion,tools by Julian Edgar

Back here  I raved about how much fun I had driving a Bobcat (or, more correctly a skid-steer Cat 226 B2).

I’d hired it to clear the site for my new home workshop, a step I’d taken as a result of getting crazily high quotes for others to do the work. Before hiring the Cat, I’d thought it might be rather fun to drive such a machine, but after only a few minutes of driving the Cat around my block, I knew it was much better than that – it was just an absolute blast.

So when I needed an absorption trench dug, I didn’t bother getting quotes for others to do it – instead, I went off and hired a small excavator.

As with the skid-steer machine, the hire company was happy to deliver the excavator to my place, and – again as with the skid steer – they gave me just a short tuition in operating the machine before heading off.

So what did I have this time?

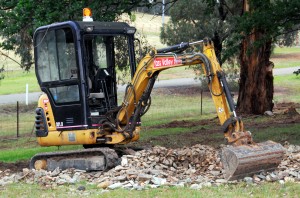
The machine was a Cat 301.8, a 1.8 tonne machine boasting only 14kW from its little naturally aspirated diesel. It had a grader blade at one end and an excavator arm at the other, complete with three different buckets to choose from. It ran on rubber tracks.

Compared with the skid-steer, it was harder to drive – more levers sprouted within the cabin and their use seemed less intuitive.

So it was harder – but was it fun? Well, no, not really. And definitely not in the same way as the Bobcat.

Look, if I get a chance to drive a little excavator again I’ll take it – but I won’t be wildly excited. To me the machine felt like a workhorse, a slow plodder that dug my trench, put the spoil to one side, carried the rocks to fill the excavation, and then pushed the soil back over the top.

But its movement from place to place was akin to a snail, tree roots required tedious successive bites with the bucket, and when you tried to do multiple operations simultaneously, you could feel the engine slow. I even stalled it a few times – interesting, when there’s no clutch!

Good aspects were its ability to rotate while keeping the tracks still (and it didn’t make me feel sick as I thought it might) and, as with the skid steer, the subtlety of control was impressive.

Now a much bigger, more powerful excavator? Now I reckon that would be a heap of fun…

Some great products to buy

Posted on March 22nd, 2011 in Opinion,tools by Julian Edgar


I’ve recently bought three products that I think might interest you.

The first is an OBD reader and display.

Over the years, I’ve experimented with a variety of OBD readers, including:

  • Using a data cable that links the OBD port to a smart phone
  • Using a commercial module that acts as an interface between the OBD port and the USB port of a PC and lets you read and reset trouble codes
  • Trialling a commercial unit with a colour screen and ‘live’ dial gauge readout of engine parameters
  • Using a small unit that is left plugged into the OBD port on a continuous basis, logging driving behaviour

(The last one, CarChip, I think is an excellent tool for this sort of continuous logging. To view and graph the data, you just unplug it from the car and connect it to a PC cable. See here for more on this device.)

However, the other OBD units have all been problematic to a greater or lesser degree. The one that looked most promising needed multiple firmware upgrades from the seller before it would work at all, and in the end never operated satisfactorily.

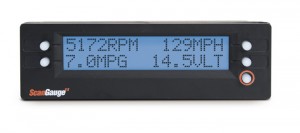
Then I bought a ScanGauge (pictured above). At the time of writing, with the Australian dollar so strong against the US dollar, the ScanGauge can be bought for around AUD$170.

And at that price it’s just a helluva bargain.

I bought it online. It arrived by post the next day: I plugged it into the OBD port, configured it without even glancing at the instructions, and have never had to touch it since.

The parameters I have chosen to select are: coolant temp, manifold pressure, throttle position and intake air temp. (Metric or imperial units are available and all OBD parameters can be displayed.)

Buying and installing dedicated gauges to show me those four parameters would have cost vastly more and taken hours, rather than seconds, to install!

The device can also be configured to show fuel consumption and also some unique, manufacturer-specific data. It’s a favourite in the hybrid community (especially with the Honda Insight and Toyota Prius owners) and I can see why.

I give it 10/10 for value and functionality.


Changing gears completely, I recently bought a new pair of sunglasses, primarily for driving. I last wrote here about sunglasses back in 2002 and now I think things have changed.

This time, the sunglasses were bought from an outdoor store – they’re sold not only for general use but also for snow and mountaineering. I won’t be climbing too many mountains, but behind the steering wheel I find them quite incredible.

They’re Julbo Colorado with polycarbonate Spectron lenses having an anti-reflective coating.

The lenses are claimed to provide 100 per cent UV protection and to reduce visible light transmission by 95 per cent. I don’t really know what those figures mean, but what I find is that they’re just fantastic in reducing glare.

The lenses have a brown tinge (that I don’t like all that much) but the clarity they give driving vision is amazing. The highlights seemed to be reduced in intensity but vision is still possible in the shadows.

And they’re not that expensive – say about AUD$75 here in Australia.


Finally (and don’t say I never give you an eclectic mix!), I recently bought some hammers.

The Australian eBay seller – Pacific Agriculture Forge General – directly imports the hammers and, to coin a phrase, passes on the savings.

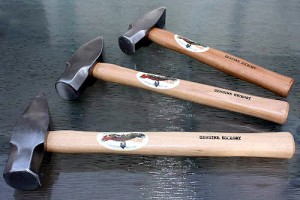
The hammers are cross-pein designs and for your money you get a set of three hammers: 2 pound, 3 pound and 4 pound. The heads are drop-forged and hardened and the handles are hickory.

The cost? Just AUD$43 for the lot! (I picked mine up from the Canberra seller, so if you live elsewhere you’ll also need to factor-in postage.)

If you can’t find the vendor on eBay, you can directly email Greg Greet at greetingsurthling (at) gmail.com.

  • » Comments Comments Off on Some great products to buy

Home Workshop Performance

Posted on May 14th, 2009 in Driving Emotion,Opinion,tools by Julian Edgar

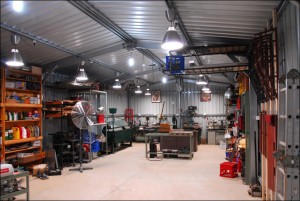
Our ‘Building a Home Workshop’ series (starts here) has been very popular. So what’s the workshop like after being in use for 9 months? What’s been learned about its performance in that time?

Firstly, the excellent.

The lighting system (an expensive and very powerful system using a lot of suspended metal halide luminaries) is well worth the time and money involved in its installation. You can be working in the late afternoon and as evening falls, not even notice the change in lighting. You can work as efficiently in the middle of the night as the middle of the day.

The internal layout – the position of power points, machine tools and workbenches – has also proved excellent. The ‘island’ workbench is particularly effective, as is the proximity of the welding bench to the main workbench. 

The tall headroom is also noticeable every time I swing a piece of tube or even carry the ladder. Talking about the ladder, the storage of items high up (clearing floor space) has also proved to work very well.

Now, the bad.

I chose to install two skylight panels on the north-facing part of the roof, down the end of the workshop furthest from the roller doors. These work well in that the summer heat build-up caused by their presence is limited but they still provide a lot of light. However, I should have used one more panel so that the back wall of the workshop (where the machine tools are located) was evenly illuminated. As it is now, on a cloudy day, the drill press, grinder and hydraulic press are a bit dim.

Ventilation is also not sufficient. Even with the two roller doors up, the twin whirligig ventilators working and a fan moving air within the workshop, the build-up of fumes while brazing or welding is excessive. This is one aspect I think I will have to change – either adding an extraction hood and exhaust fan over the welding bench or placing an opening window in the far wall.

Finally, the concrete floor has proved to be very soft, not just in the second batch (which I always knew was soft) but also in the first batch. To avoid damaging the floor, items cannot be dragged across it and nothing can be hammered on it.

Overall? Very happy indeed.

Use a variety of approaches in suspension design

Posted on March 5th, 2009 in Suspension,testing,tools by Julian Edgar

Suspension design is great fun, and very challenging.

I am not talking about ‘design’ as in picking which upgrade kit to buy for your car, but much more fundamental aspects like developing a whole new suspension – anti-dive percentage, camber change, longitudinal and lateral virtual swing arm lengths… stuff like that.

I haven’t done it for a car but I have applied exactly the same concepts to human powered vehicles.

When I designed the double wishbone front end for my first recumbent trike, I struggled with setting the ground rules. Like the:

• Position of front upper wishbone mount
• Position of rear upper wishbone mount
• Position of front lower wishbone mount
• Position of rear lower wishbone mount
• Position of upper ball-joint
• Position of lower ball-joint

With each location defined in three planes, that’s 18 variables. Add to that wheel offset and diameter, and inner and outer steering tie rod positions, and you’re looking at 26 or more accurate dimensions needed before you can even start.